DRADIS Contact!

A little side project over the last few days has been recreating the icons of the DRADIS displays from Battlestar Galactica.

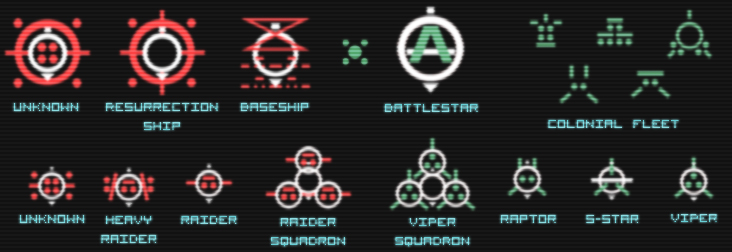
A couple notes: The small Unknown icon is conjectural. In “Resurrection Ship Part I” a small ship was represented with the large Unknown icon, and in “Hero,” they used the Cylon Raider icon for a small Unknown, but whited it out when they bleached the flashback scenes, so it was hard to tell. So I made is a combination of the large Unknown and the Raider icons.

Also, the Resurrection Ship icon was only seen once, from a distance, where it appeared to be a modified version of the large Unknown icon, though it was difficult to confirm any details. In “A Measure of Salvation,” the Resurrection Ship II: Son Of Resurrection Ship was represented by the Basestar icon, which was unhelpful. However, the fact that the civilian ships were all made of pieces of the Viper and Raptor icons was very helpful, so I have no ill will.

I’m not sure how or when I’m going to release them. I’m thinking a zip of Photoshop files with the arrow for each icon on a separate layer. I’m also thinking about making them into a set of Mac OS X icons, but I’m not quite sure about that yet.

Final note, thanks to TrekBBS poster backstept for pointing me to the almost-perfect DRADIS display font, “Visitor.” And after drawing out text pixel-by-pixel, “almost” perfect is perfect.

“Approaching Star”

Not too much to tell about this image, really. Originally, I wanted to try to get the raw, high-contrast look that the early Babylon 5 publicity renders had, so I made a fairly boring image with intent to brighten it up later in Photoshop. Well, that didn’t work out.

About a week later, I was looking at some photography websites, and decided that I needed to experiment with more techniques, not just someday, but that right then. So I pulled up the image from my harddrive, and thought back to a magazine article on making better-looking black and white photos by using the “Channel Mixer” in Photoshop instead of just de-saturating the image. A few minutes of balancing red, green, and blue, adding a little light bloom, and some film grain to complete the effect, and I had a much better image. It’s now become one of my favorites.

Rising Star (Black and White)


If you’re curious, here’s the original color image.


Also, as a bonus, here’s another render from a while ago that I didn’t bother posting on it’s own, because it was a remake of an older image that was so flat and boring that I, apparently, never bothered to post it on-line. Admittedly, this one got a bit more of a makeover than my HD rerenders normally get (usually it’s just swapping in some area lights for planet and nebulae fill lights).

Stargate Reference Information

March 14, 2021: This information is drastically out of date. I’m leaving the page up for historical reasons, but if you want far more accurate information about the design of the stargate setpiece, I recommend looking at the blog and Facebook page of The Children of Mac Gyver, or EMG, a fan-group which has used pieces of the original set-pieces and exhaustive research to construct their own stargate. You may also examine the model and renders of my newer model of the film, SG-1, and Atlantis versions of the Stargate

If you’re making you’re own Stargate and are using mine as reference, here are some larger, detailed renders, as well as information on certain details of note that aren’t entirely visible in the showcase renders.


Posted in Uncategorized